Thursday, December 30, 2021

AYWMC: Part 1 Technical, Lesson 3: Shutter Speed

 This post is part of a series entitled A Year With My Camera.
 
Lesson 1.3 in my own words:

  • Shutter speed - the speed at which the camera's shutter opens and closes.
    • The technical aspect of shutter speed is controlling the amount of light entering the camera and hitting the sensor.
      • slower speed = more light
      • faster speed = less light
    • The creative aspect of shutter speed is controlling the amount of blur in the image.
  • Blur versus camera shake
    • Blur occurs when the subject is moving.
    • Camera shake occurs when the camera is moving.
    • Both indicate a need for a faster shutter speed.
  • If shutter speed is faster than the subject is moving, you can freeze the action.

This week's project:

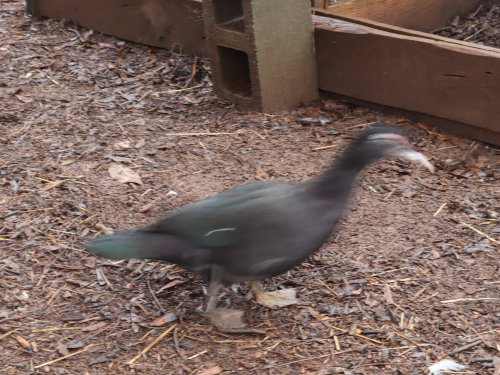
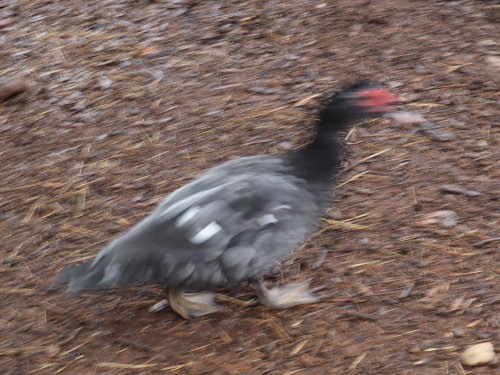
On shutter priority mode (Tv or time value), in a well lit place (preferably outside), take 2 photos of the same moving subject, one with a short shutter speed and one with a longer shutter speed.

Duck walking, short shutter speed (1/1000 sec.)

Duck walking, longer shutter speed (1/4 sec.)

What I learned:

This was a more challenging lesson than the one on aperture because changing shutter speed changed other things too. 
  1. When adjusting shutter speed on my camera, it affected brightness or darkness (you can see the difference in the above two photos). The longer the shutter speed, the brighter it got. Faster made it darker. I could preview this on the camera's LCD screen. "What you see is what you get" was one of the selling points of a mirrorless camera. Now, I'm curious whether the same is true with a DSLR.
  2. On Tv mode, I chose the shutter speed and the camera chose the aperture and ISO.
  3. I learned first hand about camera shake. With a slow shutter speed, it's difficult to hold the camera still (why a tripod would be useful!) For this lesson's photos, I judged shake vs. blur by the background. If the background was blurred as well as the subject, then I knew it was shake. Contrast the photo below with the photo above to see the difference.
Duck walking, long shutter speed (1/8 sec), and camera shake.

I realize that with just these few lessons, I'm looking at photographs differently. I now look at a photo and think about aperture and shutter speed. Not sure that's a good thing, but it is what it is.

Saturday, December 25, 2021

AYWMC: Part 1 Technical, Lesson 2: Aperture

 This post is part of a series entitled A Year With My Camera.
 
Lesson 1.2 in my own words:
  • Aperture - adjustable opening of the camera lens that can be made larger or smaller. 
    • One of three ways the camera controls the amount of light entering the camera and hitting the sensor
    • The technical aspect of aperture is controlling the amount of light
      • larger opening = more light
      • smaller opening = less light
    • The creative aspect of aperture is controlling the depth of field
  • Depth of field - how much of the image is acceptably sharp to the eye
    • a large depth of field needs a small aperture
    • a small depth of field needs a large aperture (eg. a sharp object with blurred background)
  • In the auto and program modes, the camera chooses aperture.
  • In the aperture priority mode (Av or aperture value), the photographer chooses aperture, and the camera chooses the shutter speed.
  • Aperture + shutter speed + ISO create the exposure to take the photograph.
  • Aperture settings are called f-numbers or f-stops.
    • smallest number = largest size
    • largest number = smallest size

This week's project:

1. Find and write down the name of your lens: 15-45mm
2. Find and write down the highest and lowest aperture for your lens: 
  • at 15mm: f3.5 & f22
  • at 45mm: f6.3 & f40
3. Take 2 photos which are exactly the same except for the aperture. Take one photo with your camera's largest aperture, and one with the camera's smallest aperture.

largest aperture

smallest aperture

What I learned:

I now have a basic working knowledge of what aperture is and what it does. What's a little confusing is that the largest aperture has the smallest f-number; kind of counterintuitive. Hmm, how to remember? Well, a completely open aperture looks like a big O (oh) or 0 (zero). So, the f-numbers closest to zero indicate the larger openings. As the aperture gets smaller, the numbers move further away from zero. That may not make sense to anyone else, but it works for me!

Sunday, December 19, 2021

AYWMC: Part 1: Technical, Lesson 1: Intro. to Exposure

 This post is part of a series entitled A Year With My Camera.
 
Lesson 1.1 in my own words: 
  • Exposure - the amount of light in a photograph. Overexposed photos appear too light; underexposed photos appear too dark.
  • 3 things control exposure: aperture, shutter speed, and ISO
  • In auto or program mode, the camera is programmed to adjust exposure to an approximate overall tone of 18% gray. This may or may not be correct (or what the photographer wants).
  • Overall tone - the average of all the tones in an image. To assess this, the camera is programmed to interpret color in black and white. From this, it automatically adjusts exposure to equate 18% gray.

This week's project: 

With the camera in auto or program mode, take two photos. For one, fill the camera frame with solid black (paper). For the other, fill the entire camera frame with solid white. Aim for the same lighting for each, with no shadows, highlights, or reflections. 

photo of black posterboard

photo of white posterboard

What I learned: 

The project illustrates the lesson! That the camera will default to a mid-tone gray when dealing with color. Interesting.

Thursday, December 16, 2021

A Year With My Camera (AYWMC)

A Year With My Camera is a beginners photography course, designed to teach beginners how to use their camera's manual controls to become better photographers. It's free, with weekly email lessons and homework. 

The course and its community are founded on three basic principles:
  1. "The only photographer I will compare myself to is the one I used to be."
  2. "Progress, not perfection."
  3. "Don't forget to have fun."
Of the community, it's all on either instagram or a phone app. I'm not on instagram, and I don't have a mobile phone, so I'm going to put all my lesson notes and homework assignments here, on my photography blog. 

Part 1: Technical


Part 2: Composition


Part 3: Light


Part 4: Creativity

 
Part 5: Editing
 

Part 6: Tripods

30 Photos 21: Weather


TAD: Christmas Present


Linking up with Rain's Thursday Art Date.

30 Photos 20: Stripes

Sky stripes at sunrise

30 Photos 19: Self Portrait

Monday, December 13, 2021

30 Photos 11: Shadows


Trellis shadow on the side of the house.

30 Photos 10: Food


Making lentil soup.

30 Photos 9: Older Than Me

This one was taken with my new macro lens. The gold thimble belonged to my great-grandmother. The coverlet was handwoven by my great-grandfather's great-grandmother. Both are treasured heirlooms and older than me.


30 Photos 8: Lit By a Window

More testing out my new camera. My previous cameras did very poorly with low light, and the photos were always grainy. I was curious how this one would do in low light without the flash, so I chose an outdoor night shot for this theme. I'm not disappointed!


30 Photos 7: Reflection


Sunday, December 12, 2021

30 Photos 6: Snail's Eye View

This one was fun! I love the way my adjustable preview screen pivots and turns.


30 Photos 5: Abstract

This one made me think. It would have been easy to obtain abstract with a photo editor or one of the camera's built-in creative filter modes. But I'm working in beginner mode (auto) until I learn my way around the dozens of menus, so I challenged myself with this theme to use the camera as I have it set up now. The camera wants to "correct" shots in the auto mode, which further adds to the challenge. 

One thing I learned from this exercise is, if I'm closer to the object than the lens can accommodate, the camera won't shoot.


30 Photos 4: Midday


A drizzly midday.

Friday, December 10, 2021

30 Photos 1: Fill Frame With Color


Make 30 Photos Challenge

I have a new camera! My goal is to move beyond being dependent on a camera's auto mode and learn how to use the manual settings. But first, I need to become familiar with the new buttons, menus, and screen icons. To give me some subject matter for that, I'm going to take advantage of the Make 30 Photos challenge found at the A Year With My Camera website. There's an official group to join, but I'm not on Instagram, so I'll just do it on my own and share my photos here.

Here is the list of photo prompts, linked to my photos:

  1. Fill frame with colour
  2. Things in threes
  3. Kitchen
  4. Taken at midday
  5. Abstract
  6. Snail's eye view
  7. Reflection
  8. Lit by a window
  9. Older than me
  10. Food
  11. Shadows
  12. Plain background
  13. Eyecatching
  14. Behind the scenes
  15. Pattern
  16. Wildlife
  17. Just 2 colours
  18. Circles
  19. Self portrait
  20. Stripes
  21. Weather
  22. Hands
  23. Depth
  24. Vintage
  25. Texture
  26. My neighbourhood
  27. Botanical
  28. Water
  29. Books
  30. Diagonals

There's no set time frame for the challenge, and it's open to everyone; just follow this link - Make 30 Photos.

Thursday, December 9, 2021

TAD: Christmas Past


This ornament is a favorite memento. It was made by my son when he
was in kindergarten. He's now a grown man with children of his own.

For Rain's Thursday Art Date