Saturday, May 28, 2022

AYWMC: Part 5, Editing: Lesson 2, Color Edits

This post is part of a series entitled A Year With My Camera.
 
Lesson 5.2 in my own words
  • Recommended editing workflow
    • Take photo
    • Download photo to a place where you can find it again 
    • Backup your photo so it is archived (in a different place)
    • Format your memory card so it's ready to use again
    • Edit your photo (preferably non-destructively)
    • Share your photo (online or in print)
  • Three types of color editing to start with.
    • Saturation and vibrance
      • Increasing saturation makes the colors more intense
      • Can make the image pop
      • Can be overdone
      • Some editing software has a vibrance adjustment option.
      • Similar to saturation but the color is detected as saturated, vibrance won't increase saturation
      • Most photos are improved with a slight increase in saturation or vibrance (especially those shot in RAW).
    • Black and white
      • There are many ways to create black and white images.
      • Desaturation - slide the saturation slider all the way to the left.
      • Software presets or filters - like "sepia tone" or "film noir".
      • Black and white conversion - found in most photo editing software.
      • Apps and add-ons - specific to various devices, operating systems, and editing programs.
    • Color temperature (again)
      • Can correct color
      • Can add a warm or cool feeling to an image

This week's project
  • Try one or more of the techniques in this week's lesson.
  • Experiment with over-editing.
  • Try minimal edits that enhance your image without being immediately apparent (especially important when editing portrait shots, to not create odd colored skin tones).

I'm trying to learn two different image editors: GIMP for JPEGs and ART for RAW. So, I've done a set of color edit experiments with each. Initially, I was tempted to include some of the edits we learned in the last lesson, but decided to just experiment with the edits in this lesson to better understand what they do.

The photo was taken on a foggy morning just before sunrise. It's a little bland and could use some color tweaking.

JPEG in GIMP

1. Original JPEG

2. Saturation 1.5

3. Saturation 1.5 and color temperature 5000.

4. Saturation 0.0 (one way to create a black and white)

5. Saturation 3.0 (oversaturated)

6. Saturation 3.0, Color temperature 3500

RAW in ART

1. Original

2. Saturation +38

3. Saturation +100

4. Saturation +100, Vibrance 100

5. Saturation -100

6. Vibrance 25

7. Vibrance 35

8. Saturation 38, Vibrance 13

What I learned
  • I thought GIMP and ART did a comparable job in these color edits. ART, however, is more nuanced and offers a lot more options (which means more to learn).
  • GIMP doesn't have a separate vibrance edit option, but seems to combine vibrance with saturation.
  • The numbers don't seem to have a standardized meaning, but are comparative for the individual program.
  • I didn't see a whole lot of difference with vibrance in ART until I went with 100% saturation and 100% vibrance.
  • What's a pleasing outcome is very much subjective!
  • I had some trouble with saturation in ART, as it wouldn't apply to some images. One of these days, I'll go through the manual (all 554 pages!) and maybe figure it out.
  • This exercise whetted my to experiment even more. 
All images © by Leigh at Leigh's Photography Journal

Wednesday, May 25, 2022

AYWMC 5.1 Supplemental: RAW

This is a supplement to Lesson 5.1: Editing is Not Cheating 
from my blog series A Year With My Camera.

Lesson 5.1 Supplement in my own words
  • What is RAW?
    • A RAW image file contains all the original information that the camera's computer collects when the photographer presses the shutter button.
    • A JPEG image is a RAW image that has been processed and edited by the camera's computer. The extra information is deleted and the image compressed.
    • RAW images are 3x larger than JPEG images because they contain 3x the information.
    • Not an option on less expensive cameras and phones.
    • They are unique to each camera manufacturer.
    • Can be exported from a photo editor as JPEG (or other) files.
  • What are the advantages of shooting RAW images?
    • They retain all the original information contained in the image.
    • The photographer can choose what and how to edit.
    • It can be edited without degrading the photo (because it isn't compressed like JPEG images are).
  • What are the disadvantages of shooting RAW images?
    • They are 3x as large as JPEGs.
    • They are slower for the camera to save and download.
    • Memory card is filled up 3x faster and holds 3x fewer photos.
    • Can't share a RAW file.
    • Not all photo editors can work with RAW files. Those that do require a special addon.
 
Optional project for Unit 5
  • Experiment with RAW images this month.
I had a heck of a time finding a RAW image editor that works with both Linux and Canon's new RAW file format (CR3). I finally had success with ART (Another RawTherapee) which is a fork of the popular open source RawTherapee.
 
I took a variety of photos in RAW, and started to experiment. The program has a lot of editing features and it's going to take awhile to learn them. So, I thought it best to start with the three editing steps in Lesson 5.1: exposure, color temperature, and crop.
 
Original

Exposure adjusted

Color temperature adjusted

Cropped

Then in GIMP, I resized and optimized. I do this for all photos that go on my blogs. In this case, the original photo was 4012 x 6016 pixels. I resized to 333 x 500 pixels. Then I optimized it from about 230 Kb to 47 Kb. These last two steps make my images easier to load and view in a web browser.

What I learned
  • I had my introduction to the world of RAW photos: what they are and what to do with them.
  • I discovered that when I open a RAW image into ART, I'm not viewing the actual RAW image, but rather a JPEG image that the camera creates and embeds in the RAW file. This is what the RAW image editor displays and what I'm working from.
  • There is so much more control with how RAW images are edited, compared to working with JPEG in GIMP. I often found that frustrating, and is perhaps why photography was primarily utilitarian. Now, I'm getting a glimpse into the art of digital editing, and discovering it's a lot of fun!
  • I still have a lot to learn.

Resources

Sunday, May 22, 2022

AYWMC: Part 5, Editing: Lesson 1, Editing Is Not Cheating

This post is part of a series entitled A Year With My Camera
 
Lesson 5.1 in my own words
  • All professional photographers edit their images.
  • Film photography requires chemical baths to develop images. The final look of the photo is controlled by:
    • temperature of developer bath
    • length of time in fix bath
  • Digital cameras are not designed to produce finished photographs.
    • A digital image is just a file of basic information about color and tone levels.
    • Digital images require developing (a.k.a. editing).
    • JPEG images leave the editing to the camera.
    • RAW images are unedited digital files enabling the photographer to edit as desired.
      • There's a supplemental AYWMC lesson on RAW, so I'll make my notes in a separate post
  • Editing software
    • The choices for digital photographers are:
      • Let the camera make the decisions
      • Use software designed for digital photograph editing
    • Use digital editing software is an extension of the camera.
    • Most programs used by professionals are by purchase or monthly subscription fees.
    • There are some decent free programs out there.
  • Basic editing should include checking three things:
    • Exposure - is the image correctly exposed?
      • Use histogram in the software to check
      • Check where the white point is located (the right hand side of the histogram)
      • Underexposed images can be improved by moving the white point slider to touch the right side of the histogram.
    • Color balance - do your indoor shots have a yellow cast?
      • Possible editing tools to correct color balance:
        • color temperature
        • white balance
        • neutral tone picker
        • may vary depending on program used
    • Cropping - can your image be improved by cropping?
      • Some photographers think that cropping is amateurish; that professional photographers can perfectly compose and frame the image in the camera alone.
      • To this, Emma Davies (our teacher) responds, "Says who? If you want to crop, then crop."
     
    This week's project
    • Choose a favorite image and check the 3 basic editing steps.
    • As a photo prompt for images taken for this lesson, experiment with  background separation.
    • For every image taken in this week, use your editing software for basic editing as needed.
    • Optional: Try experimenting with RAW images

    I don't know if these are favorite images, but they contain issues that I want to learn to improve. I chose them so I could experiment with the editing features discussed in the lesson. I use GIMP because it's open source and free.

    Photo 1: an indoor shot of a bowl of homegrown cherries. It has that yellowish cast indoor photos usually have from artificial lighting.

    Original photograph.

    Cropped

    Exposure adjusted to -1.

    Color temperature adjusted from 6500K (original) to 3550K

    Exposure -1 and color temperature 3550K

    Exposure -1 and color temperature 4314K

    In the exposure dialog box are two sliders: exposure and black level. Black level wasn't mentioned in the lesson, but I experimented with it anyway.

    Exposure -0.3 and black level 0.01

    Exposure -0.3, black level 0.01, and temperature 3500K

    Photo 2: an outdoor photo of a white water lily in the sun. I wanted to experiment with this one because white anything in the sun always washes out. Can I fix it in GIMP?

    Original

    Cropped (so I can focus on the flower)

    Exposure -1

    White balance (an automated function in GIMP)

    What I learned

    • I wasn't terribly satisfied with any of the results, so I'm going to need a lot of practice with this. I use my editing software for a few things, but there is much on it that I'm clueless about.
    • That GIMP seems to render exposure differently than the camera does. (I'm guessing this is because with the camera, I have three ways to control exposure: aperture, shutter speed, and ISO, plus exposure compensation).
      • In the camera, exposure compensation affects brightness
      • In GIMP, exposure control seems to add overall darkness to the image, i.e add a layer of gray. Hmm, wait a minute. This is something I learned about in the very first lesson, "Introduction to Exposure."
    • I couldn't make sense of what the lesson meant about using the histogram to adjust exposure, so that's something I need to delve into.
    • Conclusions 
      • It's best to make as many adjustments as possible with the camera. Editing may not be cheating, but it shouldn't be used as a crutch either.
      • Not to photograph white objects in direct sun.
      • That I need to do a course on how to use GIMP and all its features.
     
    Next, I'm going to tackle RAW. Emma Davies Photography Blog has an excellent article explaining it, "What is RAW and Why Do You Need It?" Then I'll take a look at the Michael the Maven video I found on my specific camera (Canon M50), to learn how to use it to shoot RAW. I'll do a separate blog post on my notes and initial experiments with it.You can find that here.

    All images © by Leigh at Leigh's Photography Journal

    Saturday, May 21, 2022

    AYWMC: Part 4, Creativity: Lesson 4, Finding Inspiration

    This post is part of a series entitled A Year With My Camera
     
    Lesson 4.4 in my own words
    • 3 principles for finding inspiration
      • Brainstorming stage - Spend 20 minutes writing down ideas without analyzing or criticizing them. There's no right or wrong at this stage, anything goes.
      • Editing stage - Spend 20 minutes examining each idea from a practical standpoint. Cross off the least appealing ideas. If something seems impossible, look for alternatives. And  remember that truly creative ideas seem crazy at one point.
      • Incubation stage - State your goal and then go do something mundane for awhile. Don't force it. Your brain will work on the problem and an idea will be born.
     
    This week's project

    Come up with a new photography idea
    • Follow the above three steps.
    • Write it down
    • Remember, this will be new for you

    For photography inspiration, I have three ideas I'm interested in.
    • Ideas
      • An event like the late summer Renaissance Faire or minor league sports game. 
      • Time travel. I'd like a time machine that would take me back one year at a time, so I could see what our place looked like in the past. I'd take key photos at each time stop to compare.
      • Travel documentary of photos only, focusing on unusual sights and places to go. 
      • Photo stories
      • Rapid series action shots.
    • Editing. My travel days are over so that's out. A time machine is nowhere near practical, but a public event is doable. I just have to bring my camera next time I go to something like that. The others are doable now.
    • No photos yet, but I've got some time to think about it and make it happen. 
     
    What I learned

    These steps are pretty much the same thing Dan and I do for project ideas. The method works very well! I never thought of applying it to something else however, so it's nice to see it as another tool to use.

    Sunday, May 15, 2022

    AYWMC: Part 4 Creativity: Lesson 3 Nothing is Original

     This post is part of a series entitled A Year With My Camera.

    Lesson 4.3 in my own words

    • Unique versus original
    • The goal to take an original photograph is a stumbling block
      • Everything and every place have been photographed
      • Every technique has been tried
      • Advancements in technology are only briefly original
        • Color film
        • Digital photography
        • Drones
    • The goal should be to take unique photographs

    This week's project
     
    Permission to be unoriginal
    • Remember why you are different from everyone else. Write it down.
    • How would a close friend describe you in three words?
    • Think about subjects and styles you're drawn to.
      • Viewpoint - do you prefer dramatic, unusual, safe, static?
      • Composition - do you prefer neatness, order, chaos, random order, symmetry, asymmetry, full frame, or minimalist?
      • Aperture - Do you prefer shooting wide open or with front to back depth of field?
      • Lens choice - which lens do you prefer? which do you reach for first?
    • Go with what you like, and try to take photographs bringing something of yourself to each one. 
     
    How am I different from everyone else? How would I describe myself? I liked the three words approach, so here's what I came up with:
    • analytical
    • contemplative
    • atypical 
    Dan's three words to describe me were:
    • industrious
    • practical
    • frugal
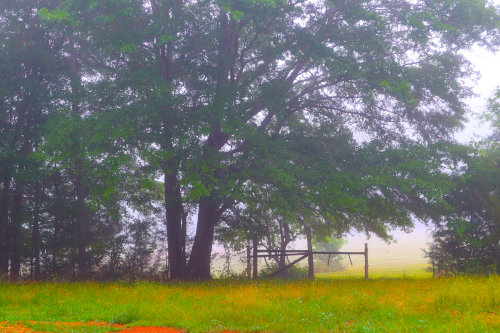
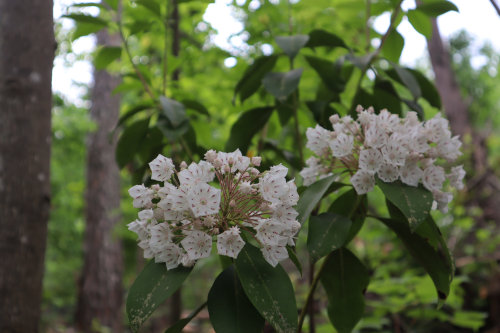
    Subjects and styles I'm drawn to:
    • I like natural subjects (as sky, plants, animals)
    • I like contrast
    • I like images that fill the frame
    • I like interesting detail
    • I like asymmetry
    • I like simple/minimalist images
    • I like close-ups with short depth of field
    • I like action shots (goats running, birds in flight, etc.)
    • I like photos that document our homestead
     
    With those things in mind, here are the photographs I took for this assignment.


    What I learned

    Initially, this was a difficult assignment for me. I procrastinated doing it. In fact, I considered skipping it! I've always considered myself creative in the realms of crafts, needlework, knitting, weaving, and writing, but photography serves a different purpose in my life. I tend to think of it as a technical skill rather than a creative one. However, when I went out with those lists in mind plus the photography techniques I've learned in this course, I found that they gave me focus with a sense of freedom. The bottom line is photographing what I like. I realized is that there's no reason why I can't use photography record keeping in my own unique way.